Over the last several weeks, we've discussed a number of ways to manipulate exposure when taking photographs. We learned about aperture and how we can use it to control Depth of Field, about how to use shutter speed to stop or blur motion and that we can use ISO to increase the sensor's sensitivity to light in order to allow us to maintain some creative control in low light situations. But how do we know if we got the exposure right? Well, you can always review the image on the LCD, but sometimes a 2.5 or 3" view of your image can be deceiving. Luckily, your camera probably has some more tools in the toolbox to help you out.
Histogram
If you start to hyperventilate when someone puts a chart in front of you, take a deep a breath and relax. This is really pretty easy to understand, but if you're still overwhelmed after reading about the histogram, don't fret. We'll also discuss another tool that can help you out.
As already eluded to, a histogram is a chart. It maps the number of different colors found within the image from pure black (far left of chart) to pure white (far right of chart) and everything in between and can be shown on your LCD as you review your photo. If your photo is of a scene with a lot of white, you will see more bars on the right of the chart. If your photo is of a scene with a lot of dark colors, more bars will appear to the left. Generally speaking, and again this will depend on the scene before you, a good exposure is one where the histogram shows a nice "bell shape" distributed across the entire histogram.

The image to the left shows a photo of the sky with the resulting histogram overlaid. You'll notice the bars are slightly right of center indicating there are more lighter colors than dark ones. This histogram also shows the various colors found in the image. Your in camera histogram may use only a single color for filling in the chart, but it is still indicating the intensity of the colors within the image.
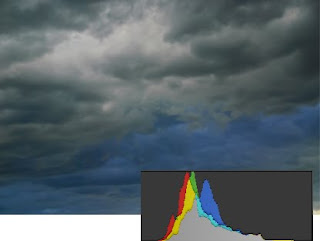
The image to the right shows the same scene with a different exposure. Notice how the histogram has shifted more to the left as the image has gotten darker and more ominous. This second image is more representative of the feeling I was trying to portray with the dark, ominous storm clouds. So how did I get the histogram to move to the left? The simple answer is that we allowed less light to get to the sensor. In this case, I sped up the shutter speed from 1/50th of a second in the first image to 1/500th of a second in the image to the right.
Without question, the most important thing to look for in your histogram are bars that reach all of the way to the top or left/right edge(s) of the chart. If this occurs, you are experiencing what is referred to as "clipping". For example, if you take a picture of the setting sun you will most likely see a bar to the far right of your histogram that stretches all the way to the top. This is your cameras way of telling you that a portion of your picture is SO white, that your sensor was unable to record any color at all - that portion of the image is clipped. As we know its the sun that's causing this, it's probably alright as we don't expect to see any detail in the sun anyway. If on the other hand you're taking a picture of someones face in bright light and you see this "clipping", you'll probably want to make some adjustments.
Highlight Mode (aka. "the blinkies")
OK, so that's the histogram. I know it can be overwhelming, but if you take the time to understand what its telling you it's really pretty simple. There's also another quick and effective way to identify if your images are "clipping". It's called the "highlight" mode. When you set the LCD on your camera to highlight mode, any areas of the image that are being clipped (or "blown out") will blink in the display. This is an immediate indication that you need to allow less light into your camera when exposing the image. As you'll recall from our prior discussions, there are a number of ways to accomplish this - higher f-stop (small aperture), faster shutter speed, lower ISO... AND exposure compensation.
Exposure compensation is a great tool for those times when you don't want to change ISO, aperture or shutter speed. It allows you to "override" what your meter is telling the camera and can allow for more or less light to be used when capturing the image. I use highlight mode almost exclusively on my LCD. After I snap the shot I refer to the LCD to check for "blinkies". If any part of the image is flashing and I don't think it should be, I use the exposure compensation to tell the camera to allow less light into the capture. Now here's a BIG caveat. If you adjust your exposure compensation and then move to another scene that no longer requires the adjustment, be sure you reset your exposure compensation. If you don't and fail to check your LCD, you may end up with a bunch of pictures that are underexposed or dark.
Well, I think that's more than enough for this week. Understanding how to check your exposure is a key component to getting quality photos. Spend some time with your camera so you know how to display your histogram, show the highlight mode and use exposure compensation. It will go a long way in improving your images. After all, isn't it better to be able to retake the picture than find out when you get home and import your images that things aren't as you expected? If you'd like to learn more about checking your exposure, don't forget about the
Digital Photography School web site or check out this
post from professional wedding photographer, David Ziser.
Until next time, keep click'n.
-Ken

 The image to the right shows the same scene with a different exposure. Notice how the histogram has shifted more to the left as the image has gotten darker and more ominous. This second image is more representative of the feeling I was trying to portray with the dark, ominous storm clouds. So how did I get the histogram to move to the left? The simple answer is that we allowed less light to get to the sensor. In this case, I sped up the shutter speed from 1/50th of a second in the first image to 1/500th of a second in the image to the right.
0 comments:
Post a Comment